TOOL MAKING
One of the things I like to do is collect old or broken tools and discarded metal. On occasion when I need a specialty tool, I dig through the junk draw or scrap pile to see if I can first make it from something else. Here are some tools I have made.
CHUCK JAWS
![](https://static.wixstatic.com/media/a1a490_15651f18fc10471e9937510be895ad5e.jpg/v1/fill/w_239,h_134,al_c,q_80,usm_0.66_1.00_0.01,enc_avif,quality_auto/a1a490_15651f18fc10471e9937510be895ad5e.jpg)
![3 Jaw chuck with newly made jaws](https://static.wixstatic.com/media/a1a490_45e387e741de4cb39f3abbcae2ad2753.jpg/v1/fill/w_980,h_735,al_c,q_85,usm_0.66_1.00_0.01,enc_avif,quality_auto/a1a490_45e387e741de4cb39f3abbcae2ad2753.jpg)
![Chuck Jaws Precut Mounted on Indexer](https://static.wixstatic.com/media/a1a490_fa90be5e52204b9cb021cef1b44be6ec.jpg/v1/fill/w_980,h_735,al_c,q_85,usm_0.66_1.00_0.01,enc_avif,quality_auto/a1a490_fa90be5e52204b9cb021cef1b44be6ec.jpg)
I will cut these jaws on lathe.
![Revese Jaw Set for 4 Inch Chuck,](https://static.wixstatic.com/media/a1a490_1531f648d9dc4b0c961e3e7338c95dc4.jpg/v1/fill/w_980,h_735,al_c,q_85,usm_0.66_1.00_0.01,enc_avif,quality_auto/a1a490_1531f648d9dc4b0c961e3e7338c95dc4.jpg)
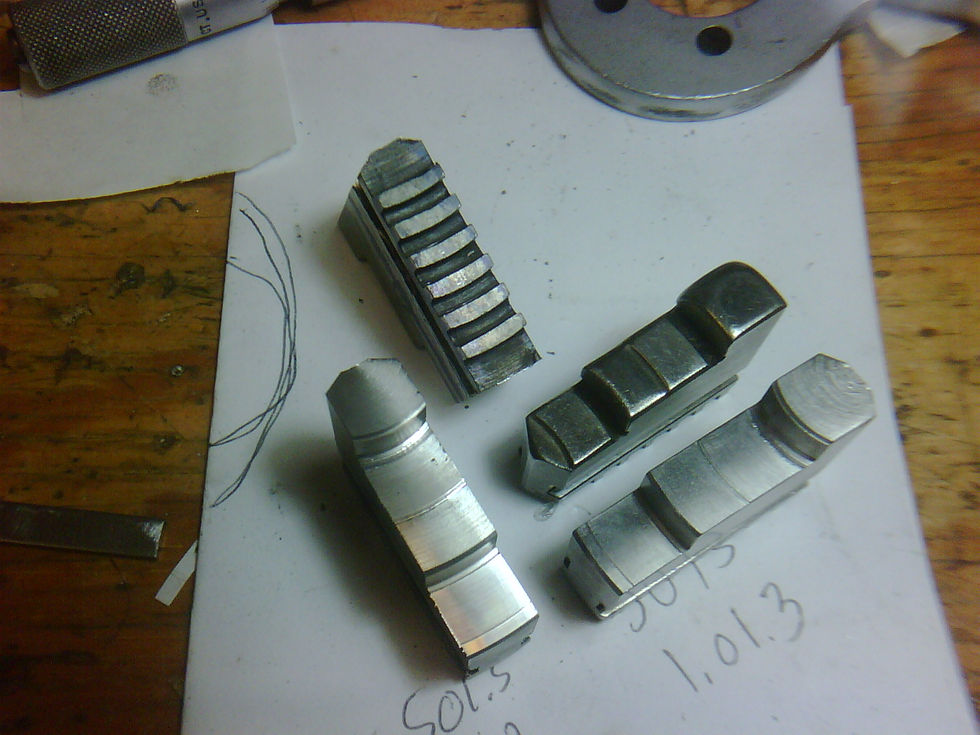
Chuck had only one set of jaws. Here is a new set I made with opposite cut.
![Small Chuck Jaw Slots Being Cut](https://static.wixstatic.com/media/a1a490_a542af585dc14c358a6cf0db42907d86.jpg/v1/fill/w_980,h_735,al_c,q_85,usm_0.66_1.00_0.01,enc_avif,quality_auto/a1a490_a542af585dc14c358a6cf0db42907d86.jpg)
![IMG00696-20100531-1847 Cutter 2](https://static.wixstatic.com/media/a1a490_1efeac6c39ea4001bf5298c73131d1b4~mv2.jpg/v1/fill/w_980,h_735,al_c,q_85,usm_0.66_1.00_0.01,enc_avif,quality_auto/a1a490_1efeac6c39ea4001bf5298c73131d1b4~mv2.jpg)
![_edited](https://static.wixstatic.com/media/a1a490_486835e3c89046c283bf89ea4793b1db~mv2.png/v1/fill/w_980,h_735,al_c,q_90,usm_0.66_1.00_0.01,enc_avif,quality_auto/a1a490_486835e3c89046c283bf89ea4793b1db~mv2.png)
![IMG00699-20100601-2022](https://static.wixstatic.com/media/a1a490_cece5e256e784bed9ce8b9d9f1371281.jpg/v1/fill/w_980,h_735,al_c,q_85,usm_0.66_1.00_0.01,enc_avif,quality_auto/a1a490_cece5e256e784bed9ce8b9d9f1371281.jpg)
![Lathe Chuck New Jaws In the Works](https://static.wixstatic.com/media/a1a490_658acb8789f1406a9e84d30a2211f609.jpg/v1/fill/w_980,h_735,al_c,q_85,usm_0.66_1.00_0.01,enc_avif,quality_auto/a1a490_658acb8789f1406a9e84d30a2211f609.jpg)
Small three jaw chuck with new jaws holding die for cutting threads.
Chuck with new jaws mounted on index head.
Three new jaws next to the old jaw with the reverse cut.
Cutting slots in new jaw using newly made slot cutter and carbide saw blades.
Cutting teeth in jaw. Each tooth radius needs to take in to account the minimum radius and the maximum radius as it moves in and out of the scroll on the chuck. So in inner and outer cut need to be made for each tooth.
This homemade cutter was made from an old lathe toolholder. It allows for in and out adjustment to cut different radius in the jaw teeth.
To make custom cutters I found this great source of carbide teeth. I have diffrent size saw blade I salvaged. so i jst pic the size i need cut it out and shape and sharpen it.
Hardend steel to make jaws from. These were cut from the blades of a industrial size wood chipper.
Wood chipper blade. good source of hard metal.
TOOL POST GRINDERS
![20160701_201841](https://static.wixstatic.com/media/a1a490_7d572d83345d43aca445f729e448bd64~mv2_d_5312_2988_s_4_2.jpg/v1/fill/w_980,h_551,al_c,q_85,usm_0.66_1.00_0.01,enc_avif,quality_auto/a1a490_7d572d83345d43aca445f729e448bd64~mv2_d_5312_2988_s_4_2.jpg)
![20160928_195821](https://static.wixstatic.com/media/a1a490_84a8154062b24ae8a88bbf2d40600a3b~mv2_d_3264_1836_s_2.jpg/v1/fill/w_980,h_551,al_c,q_85,usm_0.66_1.00_0.01,enc_avif,quality_auto/a1a490_84a8154062b24ae8a88bbf2d40600a3b~mv2_d_3264_1836_s_2.jpg)
![20161001_144549](https://static.wixstatic.com/media/a1a490_c95aa6b700a64f129aac128d3399abf6~mv2_d_1836_3264_s_2.jpg/v1/fill/w_980,h_1742,al_c,q_85,usm_0.66_1.00_0.01,enc_avif,quality_auto/a1a490_c95aa6b700a64f129aac128d3399abf6~mv2_d_1836_3264_s_2.jpg)
![20161002_003426](https://static.wixstatic.com/media/a1a490_4e880f2320dc466187cfa7e16ecbfbf5~mv2_d_1836_3264_s_2.jpg/v1/fill/w_980,h_1742,al_c,q_85,usm_0.66_1.00_0.01,enc_avif,quality_auto/a1a490_4e880f2320dc466187cfa7e16ecbfbf5~mv2_d_1836_3264_s_2.jpg)
![20161019_192706](https://static.wixstatic.com/media/a1a490_41b616559c804784b1ae6ce48944270b~mv2_d_1836_3264_s_2.jpg/v1/fill/w_980,h_1742,al_c,q_85,usm_0.66_1.00_0.01,enc_avif,quality_auto/a1a490_41b616559c804784b1ae6ce48944270b~mv2_d_1836_3264_s_2.jpg)
![20161021_192045](https://static.wixstatic.com/media/a1a490_00a69c08b6d64ced9ce69138e79f92ba~mv2_d_1836_3264_s_2.jpg/v1/fill/w_980,h_1742,al_c,q_85,usm_0.66_1.00_0.01,enc_avif,quality_auto/a1a490_00a69c08b6d64ced9ce69138e79f92ba~mv2_d_1836_3264_s_2.jpg)
![20161011_191258](https://static.wixstatic.com/media/a1a490_9bf5908a6c434b6d8874ffe5e6f39560~mv2_d_1836_3264_s_2.jpg/v1/fill/w_980,h_1742,al_c,q_85,usm_0.66_1.00_0.01,enc_avif,quality_auto/a1a490_9bf5908a6c434b6d8874ffe5e6f39560~mv2_d_1836_3264_s_2.jpg)
![20161014_220339](https://static.wixstatic.com/media/a1a490_bc22a16a143444d09063252dec50c7b6~mv2_d_3264_1836_s_2.jpg/v1/fill/w_980,h_551,al_c,q_85,usm_0.66_1.00_0.01,enc_avif,quality_auto/a1a490_bc22a16a143444d09063252dec50c7b6~mv2_d_3264_1836_s_2.jpg)
I acquired this tool post grinder missing some parts. It was designed for inside diameter grinding using small wheels capable of 30,000 RPMs. I also want to use it as a outside grinder at slower speeds.
To change the output speeds I needed to make new pulleys. See my radius cutter and extended C5 collet holder.
New 2 inch primary pulley, shown with secondary pulley which has been modified to be installed in both directions to run at slower speeds.
Now that it is updated to run at various RPMs, 1,238 - 3,750 - 7,500 - 11,250 - 22,500 -
30,000. Thus I had to come up with belts. I found that using just two wraps of cloth harness tap works fine as belts
This grinder was designed for inside diameter work, there was no wheel guards, so I needed to add some. Here I am preparing the surface in order to mount them.
4 inch wheel with wheel guard.
New piece to be made into a post to mount the grinder.
Grinder on its new post
![](https://static.wixstatic.com/media/a1a490_852a848ed8be4013bcd894afb6c7ad9f~mv2_d_3264_1836_s_2.jpg/v1/fill/w_242,h_136,al_c,q_80,usm_0.66_1.00_0.01,enc_avif,quality_auto/a1a490_852a848ed8be4013bcd894afb6c7ad9f~mv2_d_3264_1836_s_2.jpg)
Harbor Fright electric die grinder adapted into a tool post grinder. I also used with a speed controller
![](https://static.wixstatic.com/media/a1a490_c8d2874af4e04c9fbf9735c70473430d~mv2_d_5312_2988_s_4_2.jpg/v1/fill/w_238,h_134,al_c,q_80,usm_0.66_1.00_0.01,enc_avif,quality_auto/a1a490_c8d2874af4e04c9fbf9735c70473430d~mv2_d_5312_2988_s_4_2.jpg)
Note the motor attached to the tool post slide. I added this to make smother more consistent grinds.
Radius Cutter
![20160709_154944](https://static.wixstatic.com/media/a1a490_355dee7c391942da9d5441b4195c966c~mv2_d_5312_2988_s_4_2.jpg/v1/fill/w_980,h_551,al_c,q_85,usm_0.66_1.00_0.01,enc_avif,quality_auto/a1a490_355dee7c391942da9d5441b4195c966c~mv2_d_5312_2988_s_4_2.jpg)
![20160704_092227](https://static.wixstatic.com/media/a1a490_e85ba98229b145ac92df64f386731363~mv2_d_5312_2988_s_4_2.jpg/v1/fill/w_980,h_551,al_c,q_85,usm_0.66_1.00_0.01,enc_avif,quality_auto/a1a490_e85ba98229b145ac92df64f386731363~mv2_d_5312_2988_s_4_2.jpg)
![20160704_160509](https://static.wixstatic.com/media/a1a490_e3dc4f77023e48f4944a250261c979e7~mv2_d_5312_2988_s_4_2.jpg/v1/fill/w_980,h_551,al_c,q_85,usm_0.66_1.00_0.01,enc_avif,quality_auto/a1a490_e3dc4f77023e48f4944a250261c979e7~mv2_d_5312_2988_s_4_2.jpg)
![20160707_202101b](https://static.wixstatic.com/media/a1a490_7fd794c25c9e4d6e8e486649e43c52b6~mv2_d_4770_2960_s_4_2.jpg/v1/fill/w_980,h_608,al_c,q_85,usm_0.66_1.00_0.01,enc_avif,quality_auto/a1a490_7fd794c25c9e4d6e8e486649e43c52b6~mv2_d_4770_2960_s_4_2.jpg)
![20160704_231341](https://static.wixstatic.com/media/a1a490_f5001e61478a48399d99364e68e5c89f~mv2_d_5312_2988_s_4_2.jpg/v1/fill/w_980,h_551,al_c,q_85,usm_0.66_1.00_0.01,enc_avif,quality_auto/a1a490_f5001e61478a48399d99364e68e5c89f~mv2_d_5312_2988_s_4_2.jpg)
![RadToolPost](https://static.wixstatic.com/media/a1a490_3b928fb4d4c14be6832df9bbcca6348b~mv2.jpg/v1/fill/w_800,h_499,al_c,q_85,enc_avif,quality_auto/a1a490_3b928fb4d4c14be6832df9bbcca6348b~mv2.jpg)
![20160709_165944](https://static.wixstatic.com/media/a1a490_15db5a5a2075476280e625c96cb1387c~mv2_d_5312_2988_s_4_2.jpg/v1/fill/w_980,h_551,al_c,q_85,usm_0.66_1.00_0.01,enc_avif,quality_auto/a1a490_15db5a5a2075476280e625c96cb1387c~mv2_d_5312_2988_s_4_2.jpg)
Radius cutter, for cutting convex and concave shapes. Made from two truck rotors. Top rotor I made several years ago to mount on my indexer, this simply fits on top of the other one.
Discarded old rotor on left. Underside of the previously machined rotor / table
Rotor sized, cleaned up, and lapped.
Chunk of metal to be cut up into tool post.
Cutting two slots into tool post stud.
Newly made tool post, It can be moved in and out, reversed, hold 1/4 and 3/8 bits for versatility.
Test cut, worked perfect
Pre-CNC
Tool Post Indexer
![20160807_153500](https://static.wixstatic.com/media/a1a490_8ecb2039d19244f284b286c9dc1b30d1~mv2_d_3264_1836_s_2.jpg/v1/fill/w_980,h_551,al_c,q_85,usm_0.66_1.00_0.01,enc_avif,quality_auto/a1a490_8ecb2039d19244f284b286c9dc1b30d1~mv2_d_3264_1836_s_2.jpg)
![20160806_155147](https://static.wixstatic.com/media/a1a490_b8bf8f7059cd48d5821932510c11d52f~mv2_d_3264_1836_s_2.jpg/v1/fill/w_980,h_551,al_c,q_85,usm_0.66_1.00_0.01,enc_avif,quality_auto/a1a490_b8bf8f7059cd48d5821932510c11d52f~mv2_d_3264_1836_s_2.jpg)
![20160727_193607](https://static.wixstatic.com/media/a1a490_cc54934c39ff4f9abecc0b1cc0ed63f8~mv2_d_3264_1836_s_2.jpg/v1/fill/w_980,h_551,al_c,q_85,usm_0.66_1.00_0.01,enc_avif,quality_auto/a1a490_cc54934c39ff4f9abecc0b1cc0ed63f8~mv2_d_3264_1836_s_2.jpg)
![20160727_193923](https://static.wixstatic.com/media/a1a490_a95041cc7bbf4ed58302cef748417be3~mv2_d_1836_3264_s_2.jpg/v1/fill/w_980,h_1742,al_c,q_85,usm_0.66_1.00_0.01,enc_avif,quality_auto/a1a490_a95041cc7bbf4ed58302cef748417be3~mv2_d_1836_3264_s_2.jpg)
![20160801_224816](https://static.wixstatic.com/media/a1a490_aceaad44c96b471588a03c43007f8b39~mv2_d_1647_2106_s_2.jpg/v1/fill/w_980,h_1253,al_c,q_85,usm_0.66_1.00_0.01,enc_avif,quality_auto/a1a490_aceaad44c96b471588a03c43007f8b39~mv2_d_1647_2106_s_2.jpg)
Index Dial - 120 teeth and worm gear 2.5 to 1
Using tool bit to grove the measurement marks
Chucking this gear will squeeze it in three spots making for an uneven cut. My setup to cut this gear without warping it.
Perfect fit, now to press fitted on using the hydraulic press.
Worm gear can be disengaged by sliding the holder up.
Extended C5 Collet Holder
![20160925_113226](https://static.wixstatic.com/media/a1a490_6374783a2c6847508fc4e18a95067b5b~mv2_d_3264_1836_s_2.jpg/v1/fill/w_980,h_551,al_c,q_85,usm_0.66_1.00_0.01,enc_avif,quality_auto/a1a490_6374783a2c6847508fc4e18a95067b5b~mv2_d_3264_1836_s_2.jpg)
![20160904_003143](https://static.wixstatic.com/media/a1a490_7cdff75108d941afba116405d2ce3616~mv2_d_1836_3264_s_2.jpg/v1/fill/w_980,h_1742,al_c,q_85,usm_0.66_1.00_0.01,enc_avif,quality_auto/a1a490_7cdff75108d941afba116405d2ce3616~mv2_d_1836_3264_s_2.jpg)
![20160911_223137b](https://static.wixstatic.com/media/a1a490_d7d229f6c77546529d5757de3f9d77ed~mv2.jpg/v1/fill/w_980,h_1560,al_c,q_85,usm_0.66_1.00_0.01,enc_avif,quality_auto/a1a490_d7d229f6c77546529d5757de3f9d77ed~mv2.jpg)
![20160915_201401](https://static.wixstatic.com/media/a1a490_457bd5b5f0614d14ace2c7ab2388f909~mv2_d_1836_3264_s_2.jpg/v1/fill/w_980,h_1742,al_c,q_85,usm_0.66_1.00_0.01,enc_avif,quality_auto/a1a490_457bd5b5f0614d14ace2c7ab2388f909~mv2_d_1836_3264_s_2.jpg)
![20160917_163242](https://static.wixstatic.com/media/a1a490_dd10c65663c84523bb0dcb3a9edc2593~mv2_d_1836_3264_s_2.jpg/v1/fill/w_980,h_1742,al_c,q_85,usm_0.66_1.00_0.01,enc_avif,quality_auto/a1a490_dd10c65663c84523bb0dcb3a9edc2593~mv2_d_1836_3264_s_2.jpg)
![20160919_221331](https://static.wixstatic.com/media/a1a490_6d6664ed81d64e0d9a4cba31833e5f7b~mv2_d_1836_3264_s_2.jpg/v1/fill/w_980,h_1742,al_c,q_85,usm_0.66_1.00_0.01,enc_avif,quality_auto/a1a490_6d6664ed81d64e0d9a4cba31833e5f7b~mv2_d_1836_3264_s_2.jpg)
![20160919_221546](https://static.wixstatic.com/media/a1a490_961cf36b758c49b39d124bf104737ea0~mv2_d_1836_3264_s_2.jpg/v1/fill/w_980,h_1742,al_c,q_85,usm_0.66_1.00_0.01,enc_avif,quality_auto/a1a490_961cf36b758c49b39d124bf104737ea0~mv2_d_1836_3264_s_2.jpg)
![20160923_235846](https://static.wixstatic.com/media/a1a490_9708909259e04c08b4b5a8d7ac3c0169~mv2_d_1580_2348_s_2.jpg/v1/fill/w_980,h_1456,al_c,q_85,usm_0.66_1.00_0.01,enc_avif,quality_auto/a1a490_9708909259e04c08b4b5a8d7ac3c0169~mv2_d_1580_2348_s_2.jpg)
Extended C5 collet holder to hold material farther out over the center of the machine , used with tool like the radius cutter
The base was made from a truck axle hub, and will be cut to match up to the lathe spindle. The threaded holes will be used to do fine adjustments. I later found that I can keep .0002 TIR 8" out from spindel
Press in this thick walled tube hat was from an old hydraulic piston.
On 20 ton press getting ready to press this last piece in place.
I used the new tool post indexer to set the 10 degree angle.
Grind worked out well.
Test rub confirms the right angle was ground.
Compleated
Bull Nose Live Center
![20160907_222547](https://static.wixstatic.com/media/a1a490_f0990c84d3694773a96c04230cfa9259~mv2_d_3264_1836_s_2.jpg/v1/fill/w_980,h_551,al_c,q_85,usm_0.66_1.00_0.01,enc_avif,quality_auto/a1a490_f0990c84d3694773a96c04230cfa9259~mv2_d_3264_1836_s_2.jpg)
![20160907_222503](https://static.wixstatic.com/media/a1a490_9cecab41cc45472a87c16913a6dd8106~mv2_d_3264_1836_s_2.jpg/v1/fill/w_980,h_551,al_c,q_85,usm_0.66_1.00_0.01,enc_avif,quality_auto/a1a490_9cecab41cc45472a87c16913a6dd8106~mv2_d_3264_1836_s_2.jpg)
Bull nose adapter to fit on my live center. Made from a piece from a old computer real to real tape drive
Can accommodate 3" Pipe. Designed with a very tight fit, requires heavy weight oil to slip on and off without binding.
LONG REACH CUTTER
![IMG00311-20100303-0721](https://static.wixstatic.com/media/a1a490_94b965f340834bacbaa36180d6a8bfcf.jpg/v1/fill/w_980,h_735,al_c,q_85,usm_0.66_1.00_0.01,enc_avif,quality_auto/a1a490_94b965f340834bacbaa36180d6a8bfcf.jpg)
![IMG00310-20100302-0658](https://static.wixstatic.com/media/a1a490_15d54cd89517440f80e7f883e591f954.jpg/v1/fill/w_980,h_735,al_c,q_85,usm_0.66_1.00_0.01,enc_avif,quality_auto/a1a490_15d54cd89517440f80e7f883e591f954.jpg)
Cutter for reaching around the back side. Making a R9 collet with precision taper.
Long reach cutter was made from an old pair of sheet metal cutting scissors.
![](https://static.wixstatic.com/media/a1a490_95cb41ec8d774644afa01d9b2138bc86.jpg/v1/fill/w_249,h_187,al_c,q_80,usm_0.66_1.00_0.01,enc_avif,quality_auto/a1a490_95cb41ec8d774644afa01d9b2138bc86.jpg)
Star chisels, one has already been converted into a boring bar.
![](https://static.wixstatic.com/media/a1a490_22bcb396c77e40e192e396964ba42899.jpg/v1/fill/w_249,h_187,al_c,q_80,usm_0.66_1.00_0.01,enc_avif,quality_auto/a1a490_22bcb396c77e40e192e396964ba42899.jpg)
Star chisel being converted into a boring bar.
![](https://static.wixstatic.com/media/a1a490_053970c1be924d36b928dc57fb922a92.jpg/v1/fill/w_249,h_187,al_c,q_80,usm_0.66_1.00_0.01,enc_avif,quality_auto/a1a490_053970c1be924d36b928dc57fb922a92.jpg)
Boring bar In action.
Parallel Bar / Straight Edge
![](https://static.wixstatic.com/media/a1a490_330a1d31eef44d8aa11940b6cc508d76~mv2_d_3264_1836_s_2.jpg/v1/fill/w_250,h_141,al_c,q_80,usm_0.66_1.00_0.01,enc_avif,quality_auto/a1a490_330a1d31eef44d8aa11940b6cc508d76~mv2_d_3264_1836_s_2.jpg)
Parallel bars made from accurizing old dot matrix printers platen bars using lapping compound. Accurate to .00015 across the 19.5 inch bar. Comparable to Starrett quality
![](https://static.wixstatic.com/media/a1a490_f3ca555bcb0a4f9bb15891c090bc4f7f~mv2_d_3264_1836_s_2.jpg/v1/fill/w_251,h_141,al_c,q_80,usm_0.66_1.00_0.01,enc_avif,quality_auto/a1a490_f3ca555bcb0a4f9bb15891c090bc4f7f~mv2_d_3264_1836_s_2.jpg)
Parallel bar testing flatness against flat stone. White light converted to green and purple reveals a variance of about 400 to 500 Nanometers
![](https://static.wixstatic.com/media/a1a490_2147a51b6de84c89a772f44bb3bb59ca~mv2.jpg/v1/fill/w_175,h_251,al_c,q_80,usm_0.66_1.00_0.01,enc_avif,quality_auto/a1a490_2147a51b6de84c89a772f44bb3bb59ca~mv2.jpg)